Introduction:
Es.pectrum is an emulator of Spectrum machines. Actually, it does emulate 52 different models. It is also capable of emulating additional hardware, different options and configurations, etc.
This manual is always for the most current version of the emulator.
Characteristics:
- Everything is included in a single small executable.
- Emulation of official models: 16, 48, 48+ (Spanish, Swedish, Arab), 48 NTSC, 128, 128+ (Spanish), grey +2 (Spanish, English, French, Arab), black +2 (Spanish, English, Arab) v4.0 and v4.1, +3 (Spanish, English) v4.0 and v4.1, Timex TC2048, Timex TC2068, Timex TS2068, Unipolbrit Komputer 2086.
- Emulation of clones: Inves+, Tk90x (Portuguese, Argentinian), Tk95 (Portuguese, Argentinian), Orel BK-08, Pentagon 128, Pentagon 512, Pentagon 1024 SL v2.x, Scorpion ZS-256, Scorpion ZS-256 Turbo+, Leningrad, Dubna 48K, ATM-Turbo, ATM-Turbo 2+, Ice-Felix HC-91, BK-0001, Vesta IK-30.
- Emulation of arcades: Foton-IK03.
- Emulation of consoles: Alf TV Game (Elf).
- Emulation of mods: +2e (Spanish, English), +3e (Spanish, English), Spanish Pentagon.
- Emulation of virtual ones: Spec256-48, Spec256-128.
- Recognized formats:
- Snapshot: Z80, SNA, SP, FSU, SZX, EZX, ESP (native).
- Cartridge: DCK, ROM (IF2, Dandanator, Foton-IK, Alf TV Game), BIN.
- Actions: RZX.
- Tape: TAP, TZX, PZX, CSW, WAV, VOC.
- Disc: DSK, FDI, TRD, SCL, Hobbeta, MDR (if it can be considered as one).
- Screen: PNG, GIF (animated), SCR.
- Video: WMV.
- Storage: HDF, RAW / BIN, IMG.
- Emulation of hardware:
- Dandanator, including old versions.
- Multiply.
- ZXMMC and DivMMC.
- DivIDE, NemoIDE and ATM2 IDE. HDs and CDs.
- NemoIDE.
- Spectranet.
- Betadisc: Beta, Beta+, Beta 128, and clones: Apina, CAS, Arcade, IDS 91, CBI 95.
- MGT: Disciple, Plus D, Plus D with Uni-DOS
- Interface I (v2) with microdrives.
- Multiface 1, 128, +3, SpecMate, CopiaSoft+3.
- Data-Gear (DMA).
- PDS (development system). Requires a special DosBox version for linking.
- Turbo Sound.
- General Sound.
- Covox, Specdrum.
- 16c modes in Pentagon.
- 64 / 4096 colour palette in Pentagon.
- ULA+.
- ZX1 extras (raster interruption, turbo, 128x96 mode).
- Timex video modes.
- Z80_GFX and 256 colour modes (Spec256, EmuzWin).
- Joysticks: Cursor / Protek / AGF, Sinclair 1 and 2, Fuller, Kempston.
- Mouse: Kempston.
- Guns: Gunstick, Lightgun.
- MIDI interfaces: Cheap If I (Zombi Zombi), 128 Integrated, EMR, XRI Micon / Ventamatic / Upstream, RAM Music Machine (includes DAC), E&MM / JMS / SIEL.
- Turbo modes.
- Interface allows drag and drop.
- Fast mode allows acceleration when user decides.
- Audio and video options, including filters. Supports full screen.
- Mouse sensibility adjustment.
- Fast mode for tape loading.
- Fast mode for disc loading.
- Redefinible keyboard.
- Supports external ROMs, overriding the internal ones.
- File association add / remove.
- Can use PC joysticks / pads.
- Debugger with breakpoint at execution, read, write, input and output, supporting ranges and patterns.
- Exact emulation cycle by cycle, including video and contention.
- Manual Z80 speed change on the fly.
Requirements:
- Windows XP or superior.
- Intel Pentium 4 / AMD Athlon 64 or superior (SSE2).
- Audio output device.
- Real time video recording requires Windows 7 or superior, a capable computer.
Legal stuff:
- I do not assume any responsibility.
- You can do whatever you want with this program.
- All product names, logos, trademarks and registered trademarks are property of their respective owners.
Installation and use:
Installation:
This emulator does not need any installation, simply unzip the contents of the ZIP file in a folder and proceed to execute it.
Additionally, the program supports open files through the command line, so the user can associate file extensions with it, use it with launchers, etc.
Snapshots & cartridges:
A snapshot file is a complete state of the machine (including memory, hardware status, and sometimes other things like disc content, etc.) along with metadata about the emulated machine.
They can be open from the menu, or simply dragged over the window.
Cartridges can be considered as snapshots, they change the machine state at insertion.
Actions:
An actions file is a snapshot together with additional data describing the events that happened after that moment. It is useful to save tutorials or play sessions in a more compact way than a video.
They can be open from the menu, or simply dragged over the window.
Tapes:
A Tape file is the representation of the digital data contained in an audio tape, used as storage medium.
They can be open from the menu, or simply dragged over the window.
It is also supported direct audio capture from the PC soundcard.
discs:
A disc file contains the user data of a physical discette, along with some of its geometric information.
The emulator works with disc images in memory, with the option to dump them back when extracted. You also have the option to insert them write protected.
They can be open from the menu, or simply dragged over the window; they always mount on the first unit.
Videos:
The emulator allows video recording, registering exactly what is showed on the emulated screen and the audio.
This option requires Windows 7 or superior, and a computer capable of real time video compression. If the option doesn't appears on a N edition, the "Media feature pack" from Microsoft should be installed.
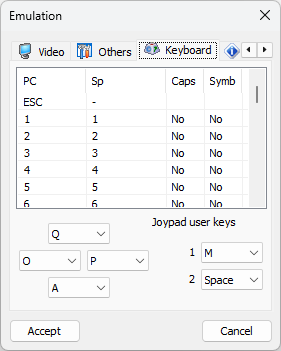
Keyboard:
The emulator allows mapping each PC key to any on the Spectrum, and optionally also Caps shift and Symbol shift.
By default, the emulator maps the keys to their equivalents, more or less. Numbers, letters, space and enter are in the same position, both Control are Symbol and both Shifts are Caps.
There are also keys that, for convenience, cause more than one keystroke: Tab is Caps + Symbol (extra), Backspace is Caps + 0 (delete), and also comma and dot are Symbol + N y M respectively.
In the case of the Orel there extra keys, with their names between parentheses.
In addition, you can emulate a joystick if you do not have one connected to the PC ("keys" in square brackets), by default PC cursors are used for directions and the numeric keyboard 0 and enter for fire 1 and 2.
Joystick:
The emulator recognizes any joystick / pad that Windows recognizes, by directly mapping the X, Y axis (or alternatively the first POV) and the first two buttons to the emulated joystick (Cursor, Sinclair 1, Sinclair 2, Fuller, Kempston), and converting the signal to digital if needed.
Mouse:
The emulator is capable of emulating a Kempston mouse. To be able to handle the pointer in the emulated Spectrum the pointer must be captured, which is done by clicking with the right button on the emulated screen. To release it, just press the escape key.
Light guns:
The emulator is capable of emulating a Gunstick or Lightgun (Sinclair, Trojan) light gun using the mouse. The instructions are the same as in the previous case.
In the case of the Gunstick, it connects to Kempston, Sinclair 1 (by specifically selecting them) or Sinclair 2 (by default) depending on the joystick option.
Additionally, it will show a special cursor on the screen to see its current position.
Mass storage:
The emulator is capable of emulating several mass storage devices. You can use both raw images and HDF files that include geometric information of the disc.
Given the size of these files, its information is not stored in the snapshots, but a link to the file that contains it.
MIDI:
The emulator is capable of emulating various MIDI interfaces, as well as redirecting their inputs and outputs to real or virtual devices connected to the PC.
For quality issues and interference with the volume control, the software synthesizer integrated in Windows is not recommended. Personally I recommend VirtualMIDISynth with the SoundFont of your choice.
Interface:
While windowed, the following elements are available:
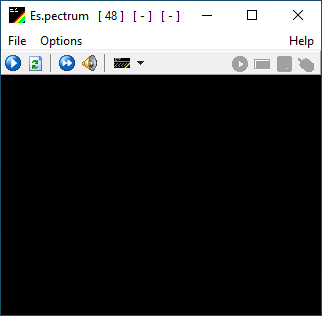
Title:
At the top there is the title bar, typical of every Windows application.
It includes the application title and also the selected Spectrum model, current tape file and current disc file.
Finally, there are the icons for minimize, maximize and close window, with the usual behaviour except for maximize: it is used to make the emulator go full screen, which can be reverted pressing Escape.
Menus:
- File
- Snap/Cart
- Open (F2) - Opens a snapshot or cartridge.
- Save (Shift+F2) - Saves a snapshot.
- Actions
- Play - Starts playing actions.
- Record - Starts recording actions.
- Stop - Stops the recording or playback of the actions.
- Screen - Saves a screenshot.
- Image (F8) - Saves the screen as an image, exactly as it's showed in the emulator, in PNG format.
- Animated - Saves the screen as a GIF file, with flashing animated.
- Dump - Dumps video memory, SCR format.
- Video
- Record - Starts video recording.
- Stop - Stops video recording.
- Tape
- Insert (F3) - Inserts a tape in the cassette.
- Capture - Captures audio.
- Extract - Extracts the tape.
- Play - Start to reproduce tape emulated audio.
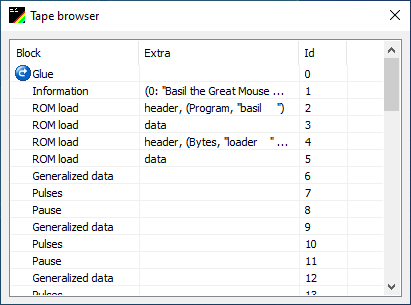
- Browse - Opens the tape browser view. On that view all the blocks on the tape are shown, marking the current one. With double click you can make current the selected one..
- Disc
- Insert (F4) - Inserts a disc in the drive.
- Extract - Removes disc from the drive.
- New - Creates a new non formatted disc and insert it.
- RO - Reads only disc.
- Dump - Dumps back the disc file if it was modified.
- Exit - Closes the emulator.
- Snap/Cart
- Options
- Hardware - Open the hardware options. It has its own section in the manual.
- Emulation - Open the options on the emulator. It has its own section in the manual.
- Languages - It has a submenu to choose one of the supported languages, and an auto-detection option.
- Debugger (Shift+F10) - Open the debugger. It has its own section in the manual.
- Persistence (F6) - Alternates between 1 frame (normal), 2 frames (GigaScreen) and 3 frames (RGB).
- Speed - Emulation speed, relative to real machine.
- Scale - Predefined window sizes.
- Start/Stop (F9) - Toggles the emulation on / off.
- Fast mode (F11) - Toggles between normal and maximum speed.
- Z80 speed - View and modify the current speed of the Z80 relative to the base one.
- Button (F10) - Some interfaces or computers have buttons; it appears when that hardware is selected. Its effect is hardware dependant.
- Reset (F12) - Restart the emulated machine, like pressing the reset button.
- Hard reset (Shift+F12) - Restart the emulated machine from zero, like power it off then on.
- Help
- Help (F1) - Open this manual in the web browser.
- About - Displays information about the emulator.
Bar:
Under the menus we have the bar, which is divided into three sections:
- Shortcuts - Shortcuts of different actions present in the menus. These are, from left to right:
- Start / Stop.
- Reset.
- Fast mode.
- Audio volume.
- Spectrum emulated model (drop down menu categorized).
- Information - Located after the shortcuts, this section is normally empty. When actions are used there are time counters here.
- Status - Aligned to the right, this section shows us visually the status of different hardware elements. From left to right we have:
- Actions.
- Mass storage.
- Disc.
- Mouse (captured).
Screen:
This section represents the emulated computer screen, rendered with its selected video options.
Allows for file dropping of snapshots, actions, tapes, discs and cartridges.
Hardware:
In this window you can choose the hardware options to emulate. The acceptance of them will cause a reset of the emulation. The options are divided into several tabs:
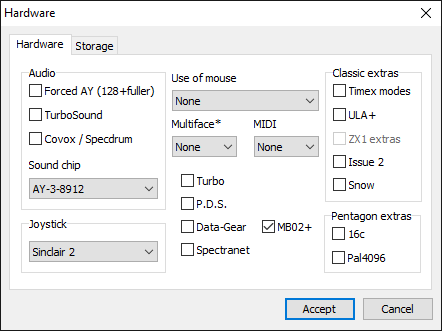

- Hardware - Define the hardware to be added over base model
- Forced AY + Sound chip - First one activates AY sound on computers without it, second one specifies type.
- TurboSound - Activates the dual AY emulation on every computer with an AY.
- Covox / Specdrum - Activates Covox at supported models, and Specdrum everywhere else.
- Joystick - Kind of emulated joystick.
- Use of mouse - Hardware emulated with the mouse: kempston mouse or guns.
- Multiface - Kind of multiface (or similar) to emulate: 1, 128, +3 and SpecMate.
- MIDI - Kind of MIDI interface to emulate.
- Turbo - Allows for turbo on hardware that supports it optionally.
- PDS - Emulation of PDS, requires a special version of DosBox.
- Data-Gear + MB02+ - First one activates Z80DMA, second one changes its ports to those of MB02+.
- Spectranet - Activates Spectranet emulation. It does not requiere installation or configuration.
- Timex modes - Add Timex video modes to computers without them.
- ULA+ - Adds ULA+.
- ZX1 extras - Can only be activated with ULA+. Adds the 128x96x16 mode, turbo and raster interruptions.
- Issue 2 - Changes ULA emulation (6C -> 5C). Some old games need it.
- Snow - Snow effect emulation in Sinclair ULAs.
- 16c - Adds 16 colour mode on Pentagons without it.
- Pal4096 - Adds 64/4096 palette on Pentagons without it.
- Storage - Mass Storage devices
- DivMMC / DivIDE / 2e / 3e / ZXMMC - In this section DivMMC / DivIDE emulation can be activated, and the SD image selected.
- ZX Dandanator! Mini - In this section the Dandanator emulation (including version of PIC FW) can be activated, and the romset selected.
- Multiply - Emulation of Multiply, connected to the Dandanator, if the last one is activated.
- Interface I - Emulation of Interface I.
- Betadisc - Emulation of Betadisc. It can emulate classic, Plus, 128, and several other clones.
- MGT - Emulation of Disciple, Plus D and Plus D with Uni-DOS.
Emulation:
In this window you can choose the options of the emulator. The acceptance of them will not cause a reset.
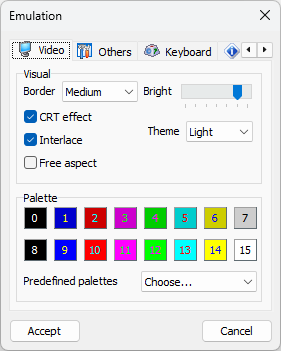
- Video
- Border - Size of the emulated border.
- Bright - Interlace intensity.
- CRT effect - Horizontal video filter, shows the pixels defined or similar to a CRT.
- Interlace - Vertical video filter, shows the pixels defined or interpolated. Its intensity depends on the bar Bright.
- Free aspect - Allows screen sizing ignoring video aspect.
- Palette - The default palette can be defined here, or choose an included one.
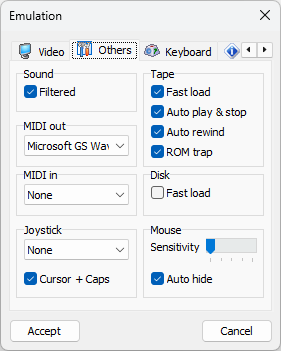
- Others
- Filtered - Audio low pass filter.
- MIDI Out - Device to redirect the MIDI output to.
- MIDI In - Device to redirect the MIDI input to.
- Joystick - Selected PC joystick for emulation.
- Cursor + mays - Caps Shift gets pressed when cursor joystick is emulated.
- Fast load (tape) - Accelerates the emulator when a tape is loading.
- Auto play & stop - Automatically starts and stop the cassette.
- Auto rewind - Automatically rewinds tape when it ends.
- ROM trap - Standar load acceleration.
- Fast load (disc) - Accelerates the emulator while disc motor is active.
- Auto hide - Automatically hides the mouse cursor if it hovers over the emulated screen.
- Sensitivity - Mouse sensitivity adjustment.
- Keyboard
- Allows you to redefine the PC keyboard. Each key corresponds to one of the Spectrum, extended keyboard (i.e. Orel BK-08) or keyboard emulated Joystick.
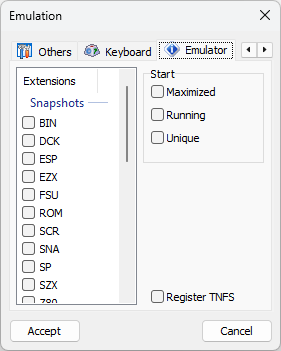
- Emulator
- Extensions - Choose which file extensions are associated or not with the emulator.
- Maximized - Emulator starts maximized.
- Running - Emulator starts running.
- Register TNFS - Register TNFS links to open with the emulator.
Volume control:
The volume control allows you to adjust the overall volume of the emulator, as well as the individual/stereo mix of each audio source.

To change a value, simply click on it. By default, each device adds up to 50% to each channel. The cells also display a small VU meter.
It's okay to exceed 100% in total: in addition to DC blocking for each source, there is dynamic range compression.
The only exception is MIDI which, being external, depends on each individual case. In the case of Microsoft's software synthesizer, only a global volume can be adjusted using the left channel.
Advanced use:
External ROMs:
The emulator includes all the necessary ROMs for emulation in its own executable.
However, they can be replaced externally by putting a file with a specific name and no extension in the emulator folder. Each of these files contains the dump of all its ROMs, in their traditional order.
Computer ROMs:
| Computer | Name | Size (KB) |
|---|---|---|
| 16, 48, 48 NTSC, Leningrad-1, Spec256 48 | n48 | 16 |
| 48+ es | n48p | 16 |
| 48 se | Beckman | 16 |
| 48+ ar | Arab1 | 16 |
| Inves+ | Inves | 16 |
| 128, Spec256 128 | n128 | 32 |
| 128+ es | n128p | 32 |
| +2 | p2 | 32 |
| +2 es | p2e | 32 |
| +2 fr | p2f | 32 |
| +2 ar | Arab3 | 16 |
| +3 / +2A/B 4.0 | i40 | 64 |
| +3 / +2A/B 4.0 es | e40 | 64 |
| +3 / +2A/B 4.1 | i41 | 64 |
| +3 / +2A/B 4.1 es | e41 | 64 |
| +2A ar | Arab2 | 16 |
| +3e, +2e | p3Ei | 64 |
| +3e es, +2e es | p3Ee | 64 |
| Pentagon, Pentagon 512 | Penta | 32 |
| Pentagon es | PentaE | 32 |
| Pentagon 1024 SL v2.x | P1024 | 64 |
| Scorpion, Scorpion 256 Turbo+ | Scorp | 64 |
| Tk95 pt | Tk95b | 16 |
| Tk90 pt | Tk90b | 16 |
| TC 2048 | Tc2048 | 16 |
| TS 2068 / TC 2068 | Tc2068 | 24 |
| Komputer 2086 | Uk2086 | 24 |
| Tk95 sp | Tk95s | 16 |
| Tk90 sp | Tk90s | 16 |
| Orel BK-08 | Orel | 16 |
| Dubna 48K | Dubna | 16 |
| ATM-Turbo (v1.03rs) | ATM1 | 64 |
| ATM-Turbo 2+ (v1.07.13) | ATM2 | 64* |
| HC-91 | Hc91 | 32 |
| BK-001 | Bk001 | 16 |
| Vesta IK-30 | Vesta | 16 |
| Alf Tv Game (Elf) | Elf | 32* |
Peripheral ROMs:
| Peripheral | Name | Size (KB) |
|---|---|---|
| Text font ATM2 | ATMf | 2 |
| DivMMC (v0.8.9) | DivMmc | 8 |
| DivIDE (v0.8.9) | DivIde | 8 |
| Multiface 1 | Mf1 | 8 |
| Multiface 128 (v87.2) | Mf128 | 8 |
| Multiface +3 (v3.C) | Mf3 | 8 |
| Spec-Mate | SpecMate | 8 |
| CopiaSoft+3 | CSp3 | 8 |
| Beta disc (v3.0) | Beta48 | 4 |
| Beta disc plus (v4.12) | BetaPlus | 16 |
| Beta disc 128 (v5.13F) | Beta128 | 16 |
| Cbi 95 | Cbi95 | 16 |
| Ids 91 | Ids91 | 16 |
| Arcade | Arcade | 16 |
| Cas | Cas | 8 |
| Apina | Apina | 4 |
| Interface I (v2) | If1 | 16 |
| Spectranet (R1003) | SpNet | 128 |
| Disciple | Mgt1 | 128 |
| Plus D | Mgt2 | 128 |
| Plus D Uni-DOS | Mgt3 | 128 |
Debugger:
The debugger is a floating, resizeable window, and always on top of the emulator. As long as it is open, the emulator works in debugging mode.
When executing code, it acquires some transparency to indicate unavailability and to be able to see what it is underneath. Execution can always be stopped with the Escape key.
When not executing code, the current video position will be marked on the Spectrum screen with two red lines.
The window consists of several sections:
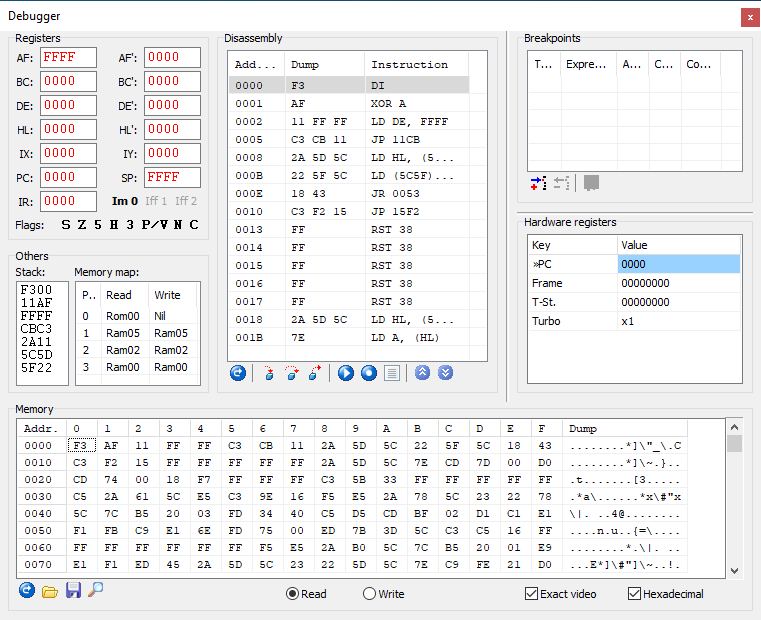
Registers:
This section shows the value of the different Z80 registers, in red if they were modified since the last operation. Their value can be modified directly.
Furthermore you can see the status of the different flags. Double clicking on them changes their value.
Finally, if you are using decimal mode, the values of the registers show their high and low parts separated if the mouse is hovered over it.
Disassembly:
This section represents a memory disassembly, by default from the PC register.
Rows with font in red indicate they have a breakpoint; the one for current PC value has also a bisque background. Double-clicking on a row fills in the data to set a breakpoint in that address.
Below are the following buttons:
- Go To - Changes the start address of the disassembly.
- Step into (F7) - Execute only the current instruction.
- Step over (F8) - Sets temporary breakpoint at the instruction following the current one, then run.
- Step out - Sets temporary breakpoint at the address indicated at the top of the stack, then run.
- Run (F9) - Continues execution.
- Run to (F4) - Sets temporary breakpoint at the selected address, then run.
- Tron - Starts / stops execution instruction by instruction mode.
- Up, Down - Browse disassembly. It can also be done using the mouse wheel over the disassembly.
Breakpoints:
This section allows you to define breakpoints. Each one has the following properties:
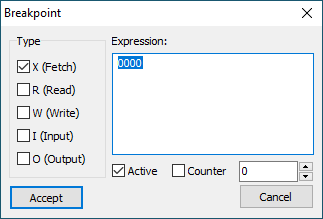
- Type - The types of accesses for which it occurs. They can be combined between Fetch (X), Read (R), Write (W), Input (I) and Output (O).
- Expression - An expression determines which directions it applies to. It is described below.
- Active - If checked, execution stops at the breakpoint.
- Counter - If checked, Count increases at the breakpoint.
- Count - Value that can be increased with the Counter option.
The buttons down below are for add, remove and edit a breakpoint. A double click over an existing one also edits it, and they can also be dragged to reorder the list.
The expression determines which addresses should cause breakpoint. Its syntax is:
- [Expression]:=[Terms] | [Terms] "=" [Value]
- [Terms]:= [Term] [Terms2]
- [Terms2]:="" | [Terms]
- [Term]:=[Base] [Pattern] | [Base] [Range]
- [Range]:=[Pattern] "-" [Pattern]
- [Value]:=[Base] [Pattern]
- [Base]:= "" | "%" [Pattern]
- [Pattern]:=[Digit] [Digits]
- [Digits]:="" | [Pattern]
- [Digit]:="0" | "1" | "2" | "3" | "4" | "5" | "6" | "7" | "8" | "9" | "A" | "B" | "C" | "D" | "E" | "F" | "X"
Notes on semantics:
- Default base is 16.
- There is not case sensitive.
- Any whitespace, carriage return, etc. is ignored, except between two [Digit]s.
- The base pattern must be a valid natural number between 2 and 16, in base 10.
- In any other context, a pattern must be a valid natural number in its corresponding base, some of its digits can be "X" indicating that any one is valid.
- A pattern that does not explicitly cover all the required bits (16 for addresses, 8 for values) will set the remaining bits to 0. Any extra bits will be ignored.
- [Base] changes the numberic base of the expression from that point onwards.
- If there is a value, it must match the content of the corresponding memory / IO (this version only match XR); if there is not, always matches.
Examples:
- X---- "3DXX" o "3D00-3DFF" - breakpoint at any Beta 128 access.
- ---IO "%2 xxxxxxxxxxxxxxx0" - breakpoint at any even port access (ULA).
- X---- "%8 X0" - breakpoint at all RSTs.
- --W-- "0-3FFF" - breakpoint at write over ROM (Dandanator).
Others:
- Stack - Shows the last values in the stack.
- Memory map - Displays the memory map of the Spectrum. With a double click on a row the mapping can be changed temporarily.
Hardware registers:
Here the value of some hardware registers is shown; again, in red those that have changed.
Memory:
This window represents a memory dump. The value of each position can be changed by writing a new value on its cell.
Below are the following buttons and options:
- Go to - Changes the start address of the dump.
- Load - Loads a memory dump, starting from the specified address.
- Save - Saves a memory dump, starting at the specified address and length.
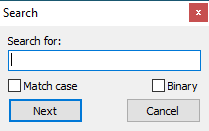
- Search - Opens the floating search window. It allows searching for text strings (case) or binary on memory.
- Read / Write - Those are used to choose which memory to work on, to read or to write (they do not have to be the same).
- Exact video - This option causes the screen to be painted in sync and with previous values as future ones. Otherwise, it is painted at whole from the current state.
- Hexadecimal - This option switches all the views and data inputs between decimal and hexadecimal.
Furthermore, while in debugging mode, certain special Z80 instructions are supported:
- ED FE (DEBUG_BP)- Software breakpoint.
- ED FF (DEBUG)- Debugging API; function in A, parameter in BC:
- 0 - The same as ED FE; BC is ignored.
- 1 - Prints the 0-ended ANSI string pointed by BC, up to 256 characters.
- 2 - Shows the value of BC and allows it's modification before continue.
- 3 - Turns the fast mode off / on, depending on BC being 0 or other value.
Formato ESP:
The Snapshot ESP format was born from the need to represent everything necessary for emulation (including tapes and discs) in a single file and at the same time to be easily manipulated by the advanced user.
Thus each ESP file is nothing more than a ZIP file, which contains other files inside. In this way it can be manipulated with any compressor application.
There are two types of files inside of it: text (INI, readable and editable with any text editor) and data dumps (other extensions, usually BIN).
There are always a "Config.ini" file (hardware configuration of the emulator), a "Hardware.ini" one (state of said hardware) and "RAM.bin" one (memory dump) present.
Each line in the text files is like "A=B", meaning propery A has value B. Inside "Hardware.ini", the Z80 registers are the "Z80_xxx" properties.
It is not intended to establish a new format, but to offer a comfortable way for the user to represent complete manipulable states. For this reason, it is not detailed in depth.
Notes:
- The Orel-BK08 accepts a second ROM. Currently, instead of being empty, it has a standard 48K ROM, so with a simple OUT compatibility and use of the keyboard can be improved.
- The ROMs of the Foton-IK03 games come in several files, one dump per IC. Just open one (as a snapshot) and the emulator will automatically read all in the same folder in order.
- The ROMs of Alf TV Game cartridges also opens as snapshots.
- In addition, on the Foton-IK03 0-7 keys adjust the switches (time for each coin) and the second fire of the joystick activates the coin mechanism. If you start with fire 1 pressed, you enter the diagnostics, except in Brodjaga (Inspector Gadget and the Circus of Fear), where the behaviour is the opposite.
- In ATM-Turbo 2+ and Alf TV Game the size of the internal ROM is variable, for versatility.
- Spec256 models swap the original / enhanced display with the Button (F10) option.
F.A.Q.:
- Do you need any programming help? => No, it's a personal project.
- Are you going to port it to macOS / Linux / Android / iOS / ...? => No, for now.
- Are you going to release the source code? => No, for now; there is still much to clean.
- When will the next version be released? => I don't know.
- I cannot create videos => If you have a "N" Windows version, please search for "Media Feature Pack".
- Do you accept donations? => Yes, I accept any Spectrum material.
More information:
Contact:
- Web: http://www.habisoft.com/espectrum
- EMail: es.pectrum [AT] habisoft [DOT] com
Thanks:
- Thanks to you for using this emulator, to Alt, Kancho, Dandare, Mad3001, Spirax, Tony Brazil for their enthusiasm.
- Special thanks to the Grupo de Usuarios de Amstrad (G.U.A.) and specially to CPCManiaco, Alt and Nandove.
- Finally, thanks to Clive Sinclair for creating the Spectrum and to Amstrad for allow the legal use of its ROMs.